How to check the IP Address of DMA

Click here to Access the DMA Page.

How to check the IP Address of Digital Media Extender Using the Router’s DHCP Client Table

Step 1:
Access the router’s web-based setup page.

Step 2:
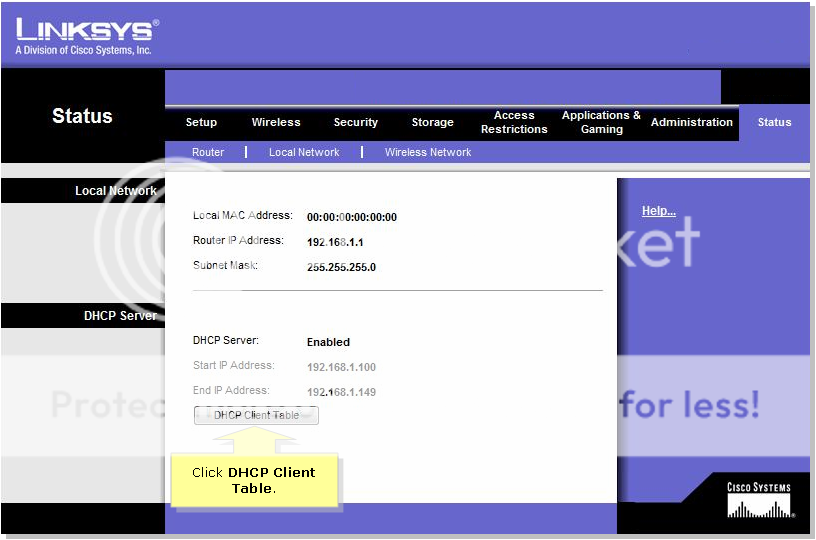
When the router’s web-based setup page appears, click Status then Local Network.

Step 3:
Click DHCP Client Table to view the devices connected to the router.


Step 4:
Check if the IP address of the media extender appears on the DHCP Client Table. After checking the IP address of the PC, ping the media extender. For instructions, follow the steps below.

Configuring Motion Detection and Email Alert on WVC200

Configuring Motion Detection and E-mail Alert

Step 1:
Access the Camera’s Web UI by going to http://Camera_IP_address[192.168.1.115]

Step 2:
Click on Setup then click Options.

Step 3:
Select Enable E-Mail Alert and fill-up the following required fields: Send To, Show “From” As, and SMTP Mail Server.

Figure 3.1 Camera Web UI

Figure 3.2 Select Enable Email Alert and make sure to fill-up the following fields: Send To, Show “From” As, and SMTP Mail Server.

Step 4:
Click on Set Area & Sensitivity to set the area of the video image that you would like to capture.


Step 5:
To check if Email Alert is working, go to Status and check the System Log.


NOTE: No recorded videos will be saved on your computer. Motion Detection videos will be automatically sent to the email address specified on E-mail alert but no video files will be saved on your computer.

ISP setting for UTV Internet UK

Following are the Settings for UTV Internet in UK for Linksys routers.

Encapsulation : PPPoE

Multiplexing : LLC

VPI : 8

VCI : 35

Expanding range of WRV200 with WAP200

Can WAP200 be used as a repeater for WRV200?

As mentioned in the datasheet of WRV200 that its compatible with only WAP54G and WAP54GPE, but these products are replaced by WAP200 and WAP200E. With the default configurations, these two devices [WRV200 and WAP200] cannot be configured together, hence it is often misunderstood that there is some compatibility issue.
Here, we will discuss how can WAP200 be configured to Repeat Signal of WRV200.

WRV200 : Hardware v1.0 ; Firmware v1.0.39.
WAP200 : Hardware v1.0 ; Firmware v1.0.22.
  • IP Address of WRV200 : 192.168.1.1
  • IP Address of WAP200 : 192.168.1.245
Ensure that the AP Isolation is set to DISABLED, Wireless isolation is DISABLED and Wireless Isolation within SSID is also DISABLED. Also ensure that there is no IP Address Conflict in the network.
Step 1 : Open the Setup page of the WRV200. Click on Wireless TAB. In Basic Wireless Settings, change the Wireless Network Mode to G-Only and the Wireless Channel to 6.


Step 2 : Now click Wireless Security[Second Subtab under wireless]. The Security Mode should be Disabled & the Wireless Isolation within SSID be also Disabled.


Step 3 : Now click WDS. And click Manualand Enter the MAC Addresses manually.


Step 4 : Now Click on Advanced Wireless Settings and Disable the AP Isolation.
Step 5 : Now open the setup page of WAP200 and set it to Repeater Mode. [ This can be configured from the Wireless TAB on the Setup page]. And Change the Wireless Nework Mode to G-Only and the Channel to 6.

Step 6 : Disable the Wireless Security and the Wireless Isolation(within SSID) to Disabled.

Step 7 : Now Click on Advanced Wireless Settings and Change the BSS Basic Rate to G-Only.
Step 8 : Now click on AP Mode and click on Wireless Repeater.


Now turn OFF WRV200 and WAP200. Turn ON WRV200 first, wait for 10 seconds and than turn the WAP200 ON. Should Work !!!
WAP200 :


______________________________________________

WRV200 :

PLTK300.

Powerline Network Kit.


Bundle of PLTE200 and PLTS200 Powerline 'Turbo' products. With Powerline Network Adapters, you can connect computers or any other wired Ethernet device using the HomePlug® 1.0 with Turbo network standard. They work with older HomePlug 1.0 devices too. Now adding more devices to the network is as simple as plugging a Powerline Adapter into an electrical outlet, and connecting your Ethernet-equipped devices to the built-in Ethernet ports. Additional devices can be connected to the same network using additional Powerline Adapters plugged into any electrical outlet anywhere in the house. The content of a similar kit is described below.


Ports for XBOX.

Ports for Xbox are 88 and 3074.


U might need to open ports in Internet Connection Firewall to use XBOX.
How to manually open ports in Internet Connection Firewall in Windows XP.
1. Click Start, and then click My Network Places.
2. Under Network Tasks, click View Network Connections. (Or, right-click My Network Places on the desktop, and then click Properties.)
3. Right-click the connection that you use for the Internet, and then click Properties.
4. Click the Advanced tab, and then click Settings.
Note If the Settings button is unavailable, ICF is not enabled on this connection, and you do not have to open any ports (because they are all already open).
5. Click Add to open a new port.
6. In the Description box, type a friendly name. For example, type File Sharing : Port 445.
7. In the Name or IP address of the computer hosting this service on your network box, type 127.0.0.1.
Note You can specify the IP address of an internal computer. But you typically will use 127.0.0.1.
8. In the External port and Internal port boxes, type the port number. Generally, this number is the same.
9. Click either TCP or UDP, and then click OK.
10. Repeat steps 1 through 9 for each port that you want to open.

Ayboll